05 April 2014
Vim Tab Madness. Buffers vs Tabs
First I have to admit, I was a heavy user of tabs in Vim.
I was using tabs in Vim as you’d use tabs in most other programs (Chrome, Terminal, Adium, etc.). I was used to the idea of a tab being the place where a document lives.
When you want to edit a document, you open a new tab and edit away! That’s how tabs work so that must be how they work in Vim right?
Nope.
Stop the Tab Madness
If you are using tabs like this then you are really limiting yourself and using a feature of Vim that wasn’t meant to work like this.
Vim’s tabs are named very badly, as others note, they would make more sense if they were called layouts.
Before I explain that, let’s be sure we understand what a buffer is in Vim as well as a few other basic things.
After that, I’ll explain the correct way to use tabs within Vim.
Buffers
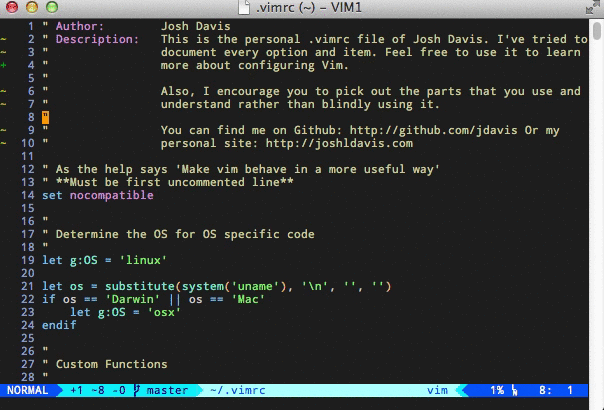
A buffer is nothing more than text that you are editing. For example, when you open a file, the content of the file is loaded into a buffer. So when you issue this command:
$ vim .vimrcYou are actually launching Vim with a single buffer that is filled with the
contents of the .vimrc file. Easy peasy!
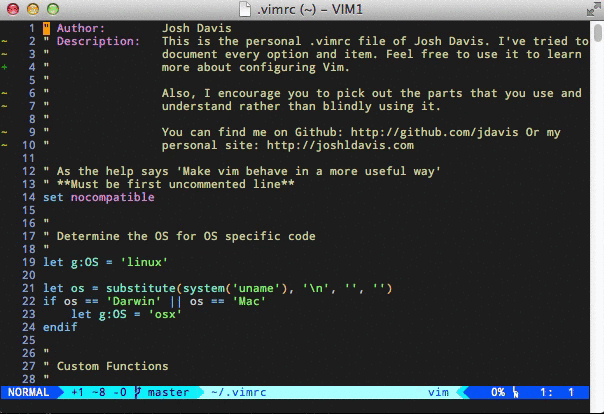
Now let’s look at what happens when you try to edit multiple files. Let’s issue this command:
$ vim .vimrc .zshrc
# In Vim run this:
#   :bnext
Vim does what it did before, but instead of just 1 buffer, it opens another buffer that is filled with .zshrc. So now we have two buffers open.
If you want to pause editing .vimrc and move to .zshrc, you could run this
command in Vim :bnext which will show the .zshrc buffer. There are various
other commands to manipulate buffers which you can see if you type :h
buffer-list.
Here’s a gif of what that looks like:
Windows
A window in Vim is just a way to view a buffer. Whenever you create a new
vertical or horizontal split, that is a window. For example, if you were to type
in :help window, it would launch a new window that shows the help
documentation.
The important thing to note is that a window can view any buffer it wishes; it
isn’t forced to look at the same buffer. And we’ve all noticed this. When
editing a file, if we type :vsplit, we will get a vertical split and in the
other window, we will see the current buffer we are editing!
That should no longer be confusing because a window lets us look at any
buffer. It just so happens that when creating a new split: :split or
:vsplit, the buffer that we view is just the current one.
By running any of the buffer commands from :h buffer-list, we can modify which
buffer a window is viewing.
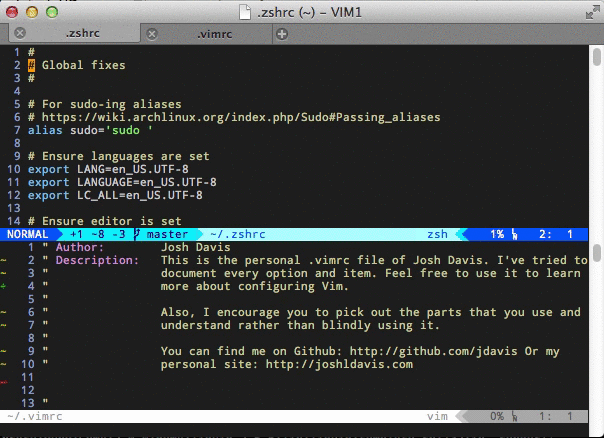
For an example of this, by running the following commands, we will start editing two files in Vim, open a new window by horizontally splitting, and then view the second buffer in the original window.
$ vim .vimrc .zshrc
# In Vim run these:
#   :split
#   :bnext
Here’s a gif of these commands:
So a Tab is…?
So now that we know what a buffer is and what a window is. Here is what Vim says in the Vim documentation regarding a buffer/window/tab:
Summary:
    A buffer is the in-memory text of a file.
    A window is a viewport on a buffer.
    A tab page is a collection of windows.
According to the documentation, a tab is just a collection of windows. This goes back to our earlier definition in that a tab is really just a layout.
A tab is only designed to give you a different layout of windows.
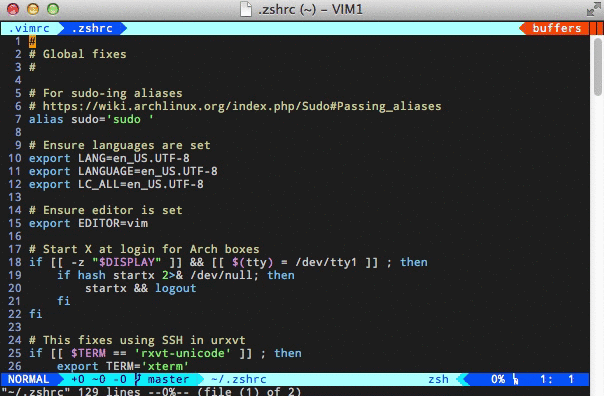
Here’s the exact same setup as last time (two files, horizontally split) with a new tab with a different layout of windows:
The first tab is just split horizontally while the second tab is split horizontally and vertically.
As you can see, the first and second tabs have different layouts yet they
are only viewing the same two buffers: .vimrc and .zshrc.
This brings us to the basic problem of tabs within Vim.
The Tab Problem
Tabs were only designed to let us have different layouts of windows. They aren’t intended to be where an open file lives; an open file is instead loaded into a buffer.
The previous gif illustrates this problem. If you can view the same buffer across all tabs, how is this like a normal tab in most other editors?
If you try to force a single tab to point to a single buffer, that is just futile. Vim just wasn’t meant to work like this.
The Buffer Solution
To reconcile all of this and learn how to use Vim’s buffers/windows effectively, it might be useful to stop using tabs altogether until you understand how to edit with just using buffers/windows.
I’m going to present two different ways to use buffers. The first is to use buffers to replicate how tabs work in other editors.
The second is a more natural way to the Vim editor that yields a lot of power.
Solution #1: Replicating Tabs with Buffers
The first thing I did was install a plugin that allows me to visualize all the buffers open across the top. There are multiple different plugins for this.
I was already using vim-airline, so I just turned on its feature to
list buffers across the top. To add airline and the buffer
list, install airline, and then just add this to your
.vimrc:
" Enable the list of buffers
let g:airline#extensions#tabline#enabled = 1

" Show just the filename
let g:airline#extensions#tabline#fnamemod = ':t'
This is the result:
Next I needed to replace the tab shortcuts that I’d no longer be using. I did this by adding these to my .vimrc as well:
" This allows buffers to be hidden if you've modified a buffer.
" This is almost a must if you wish to use buffers in this way.
set hidden

" To open a new empty buffer
" This replaces :tabnew which I used to bind to this mapping
nmap <leader>T :enew<cr>

" Move to the next buffer
nmap <leader>l :bnext<CR>

" Move to the previous buffer
nmap <leader>h :bprevious<CR>

" Close the current buffer and move to the previous one
" This replicates the idea of closing a tab
nmap <leader>bq :bp <BAR> bd #<CR>

" Show all open buffers and their status
nmap <leader>bl :ls<CR>
These settings gave me a hybrid approach to how I expected tabs to work in Vim yet it still gave me the same power that comes from understanding and using buffers.
Solution #2: Crouching Tiger, Hidden Buffer
Instead of replicating tabs across the top like we did in the previous solution, we are instead going to use the power of being able to open many buffers simultaneously without worrying about which ones are open.
In my experience, there are two plugins that I like that help a lot with this. The first is Buffergator which gives a great way to manage buffers. The second is CtrlP which is a favorite among many Vim users. It gives a powerful fuzzy finder within Vim for files.
Instead of worrying about closing buffers and managing your pseudo-tabs that was mentioned in the previous solution, you just open files that you want to edit using CtrlP and don’t worry about closing buffers or how many you have opened.
When you are done editing a file, you just save it and then open CtrlP and continue onto the next file.
CtrlP offers a few different ways to fuzzy find. You can use the following fuzziness:
- Find in your current directory.
- Find within all your open buffers.
- Find within all your open buffers sorted by Most Recently Used (MRU).
- Find with a mix of all the above.
Here are the settings that I use for working well with CtrlP:
" Setup some default ignores
let g:ctrlp_custom_ignore = {
  \ 'dir':  '\v[\/](\.(git|hg|svn)|\_site)$',
  \ 'file': '\v\.(exe|so|dll|class|png|jpg|jpeg)$',
\}

" Use the nearest .git directory as the cwd
" This makes a lot of sense if you are working on a project that is in version
" control. It also supports works with .svn, .hg, .bzr.
let g:ctrlp_working_path_mode = 'r'

" Use a leader instead of the actual named binding
nmap <leader>p :CtrlP<cr>

" Easy bindings for its various modes
nmap <leader>bb :CtrlPBuffer<cr>
nmap <leader>bm :CtrlPMixed<cr>
nmap <leader>bs :CtrlPMRU<cr>
The way I use Buffergator is to clean up buffers when I need them and to easily view what files I have edited in case I have edited one and forgot to save it.
Here are the settings and the keybindings I use for Buffergator:
" Use the right side of the screen
let g:buffergator_viewport_split_policy = 'R'

" I want my own keymappings...
let g:buffergator_suppress_keymaps = 1

" Looper buffers
"let g:buffergator_mru_cycle_loop = 1

" Go to the previous buffer open
nmap <leader>jj :BuffergatorMruCyclePrev<cr>

" Go to the next buffer open
nmap <leader>kk :BuffergatorMruCycleNext<cr>

" View the entire list of buffers open
nmap <leader>bl :BuffergatorOpen<cr>

" Shared bindings from Solution #1 from earlier
nmap <leader>T :enew<cr>
nmap <leader>bq :bp <BAR> bd #<cr>
Using Tabs Correctly
This doesn’t mean you should stop using tabs altogether. You should just use them how Vim intended you to use them.
Instead you should use them to change the layout among windows. Imagine
you are working on a C project. It might be helpful to have one tab dedicated
to normal editing, but another tab for using a vertical split for the file.h
and file.c files to make editing between them easier.
Tabs also work really well to divide up what you are working on. You could be working on one part of the project in one tab and another part of the project in another tab.
Just remember though, if you are using a single tab for each file, that isn’t how tabs in Vim were designed to be used.
Example of Using Buffers
As I claimed at the beginning of the article, using buffers is far more powerful than trying to use tabs in the way mentioned above.
To illustrate this let’s use an example. Here’s what you do as you edit:
-
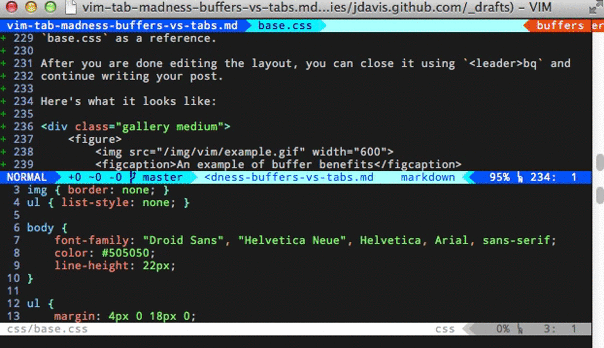
Let’s imagine you are editing your blog and writing a new blog post. In one split, you have your CSS,
base.css, as a reference and above it, you have the post that you are actually editing. -
Then let’s say you have to make a change to your homepage, instead of opening up a new tab (which is the old way of thinking), you just open up a different buffer,
index.htmlusing CtrlP. -
This will just switch the buffer you are viewing in the window to point to the
index.html. All your other windows stay intact and you can still usebase.cssas a reference below. -
After you are done editing the layout, you can close it using
<leader>bq, switch back to your post and continue writing.
Here’s what it looks like:
Conclusion
Using tabs in Vim as you would in other programs isn’t the same. Then again, when is anything in Vim like in any other program.
Learning how to use and embrace buffers and windows leads to a far more cohesive editing experience in Vim and will help eliminate a lot of frustration when trying to use tabs unnaturally.
If you have any suggestions on this article or using Vim in general, feel free to contact me, I love talking with people =]
Updated on Oct 25
I’ve updated it to present my latest solution (called Solution #2) of managing buffers in in addition to the pseudo-tab bar with buffers that now is called “Solution #1”.